No-Code Deployer
No-code Deployer is a Rollup-as-a-Service (RaaS) platform that offers the infrastructure and tools required to implement and manage rollup solutions, eliminating the need for deep expertise in the underlying technology.
Asphere Rollup Deployment
A rollup deployment process consists of the following parts:
- Sign in: Authenticate on the platform to start using its functionality.
- Deploy Rollup: Define your rollup settings, and then deploy it.
Sign in
First things first, sign in to use the platform's functionality:
- Go to the Scaling Services (opens in a new tab) platform.
- Click Sign in > Continue with Google, and then select an account you'd like to use.
Congrats — you've just signed in to the Scaling Services platform!
For those signing in for the first time, please enter your basic company information so that we know our customers.
Deploy Testnet Rollup
To deploy a rollup using a Testnet network, follow these steps:
-
Sign in on the Scaling Services (opens in a new tab) platform.
-
In Navigation, click Deploy Rollup to start a rollup configuration process.
-
On the Essentials tab, select the following rollup parameters, and then click Next:
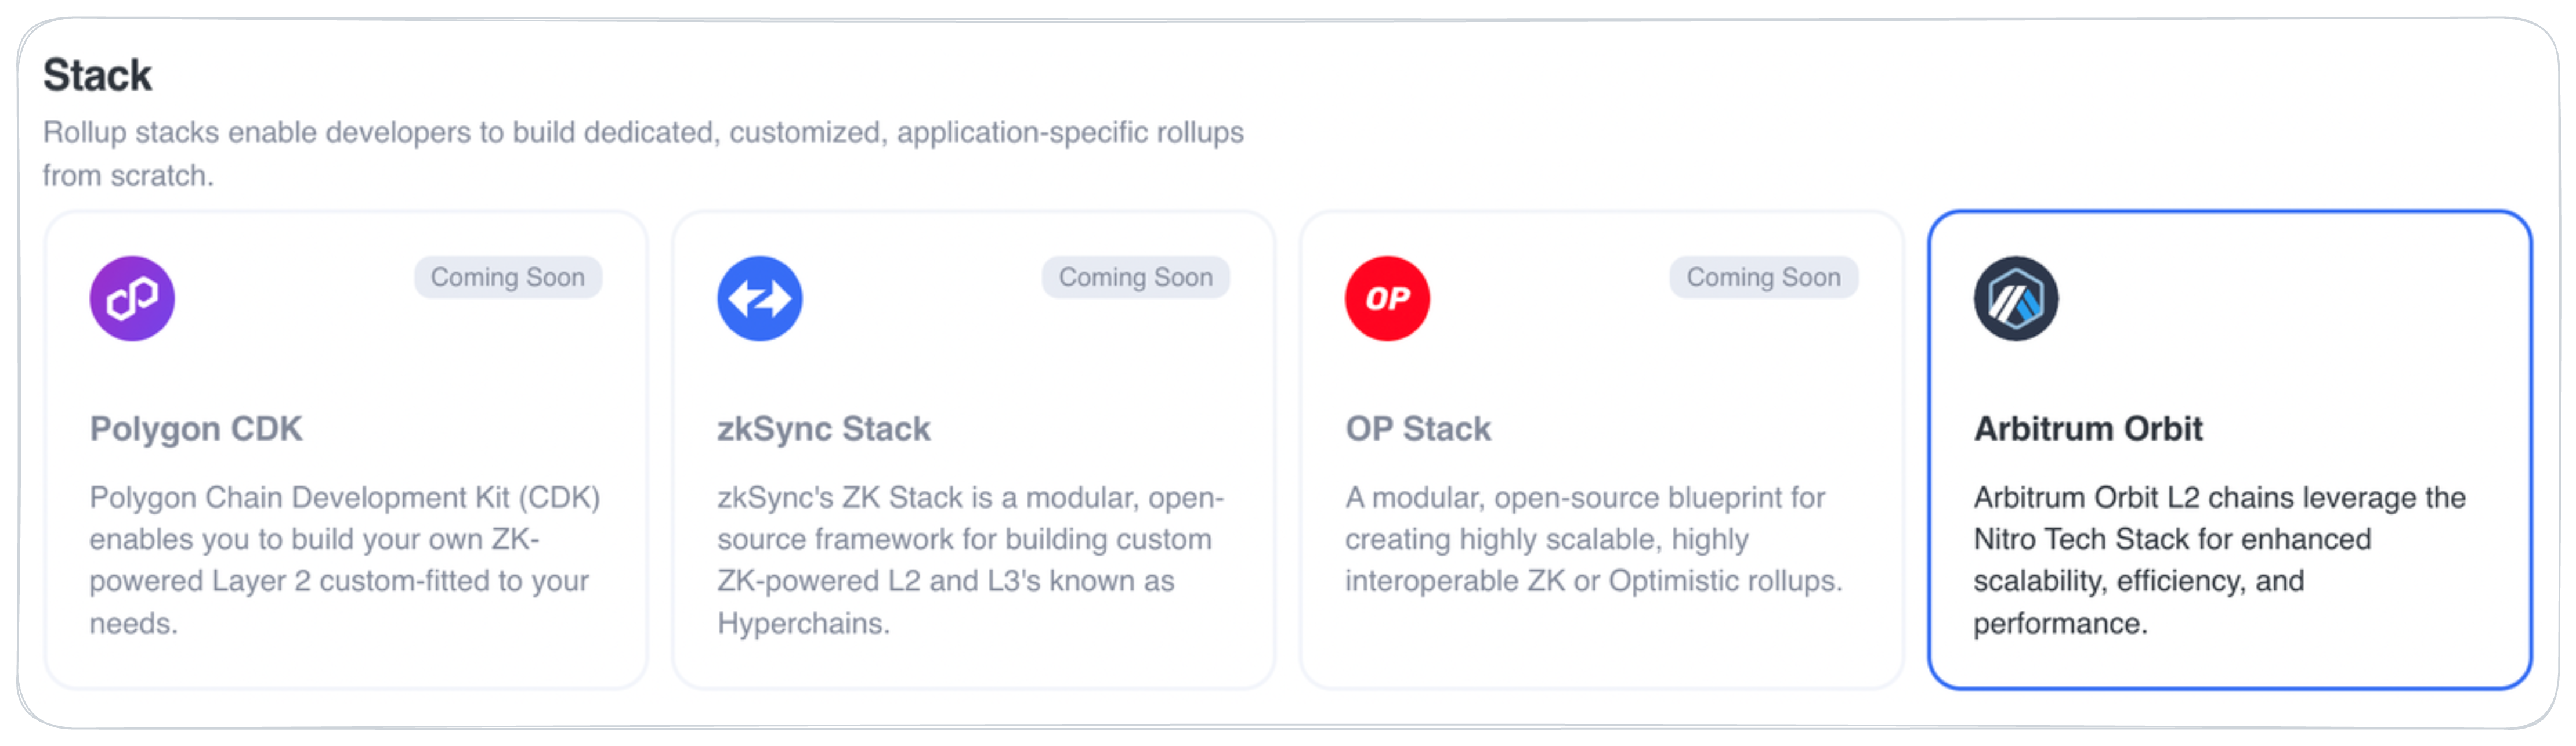
- Stack:
- Instant: Arbitrum Orbit, OP Stack, Polkadot — deploy instantly upon completing all the steps.
- Assisted (no label): Base, Agglayer CDK, ZKsync's ZK Stack — provide your rollup requirements, and we will generate a Slack or Telegram group to finalize all the aspects of your deployment specification.
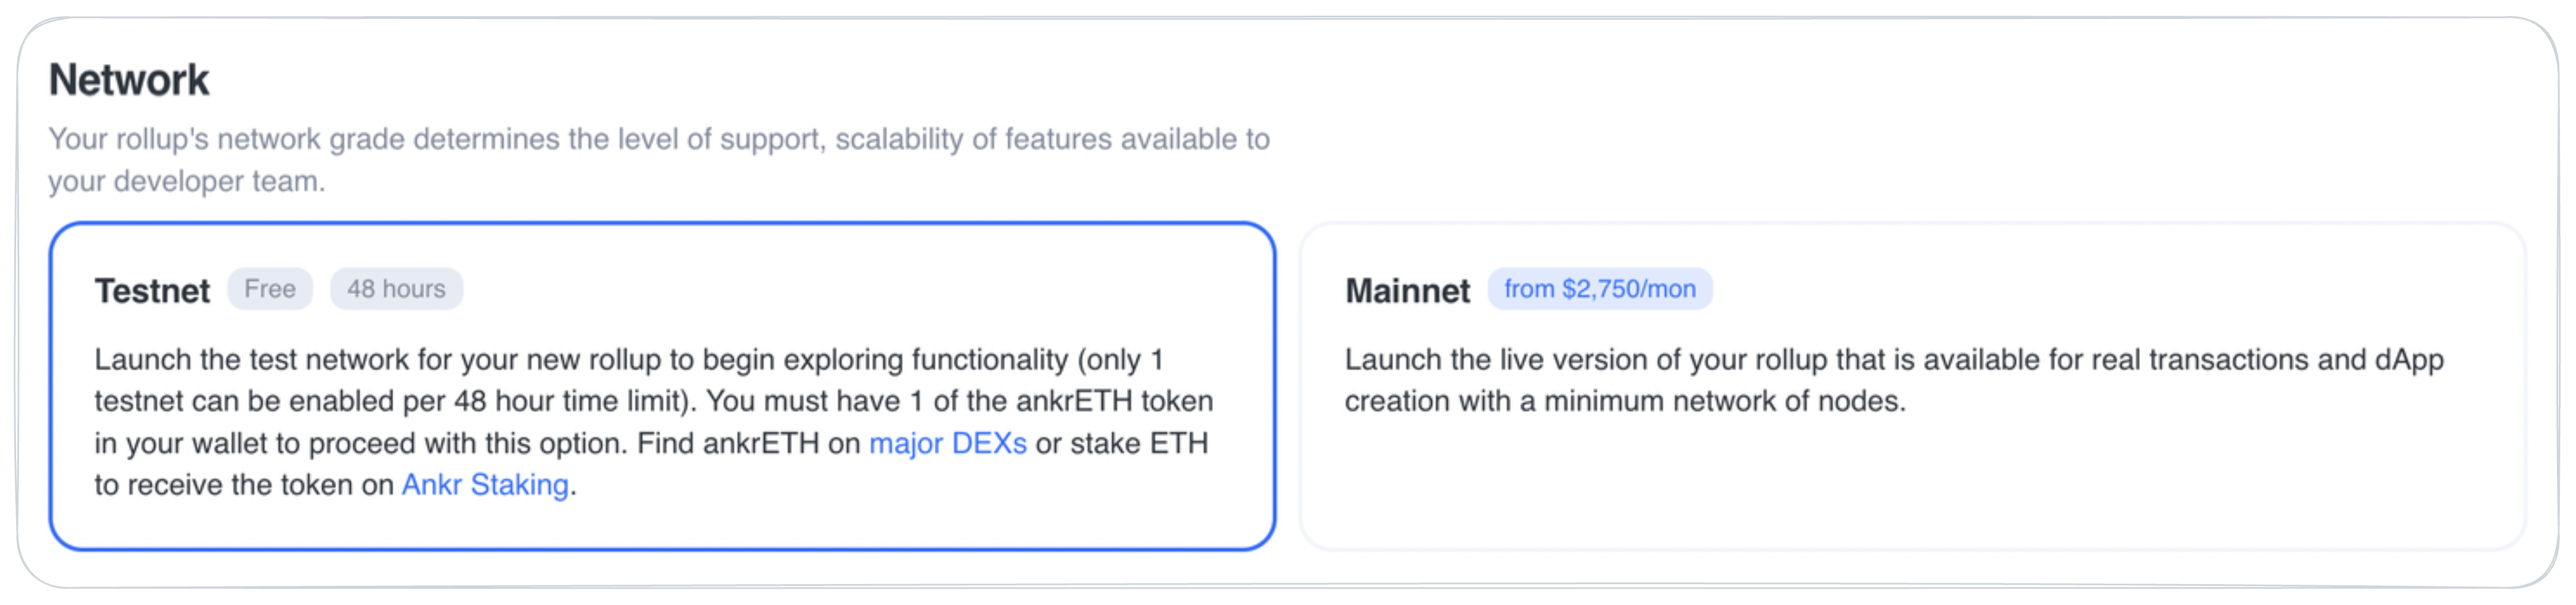
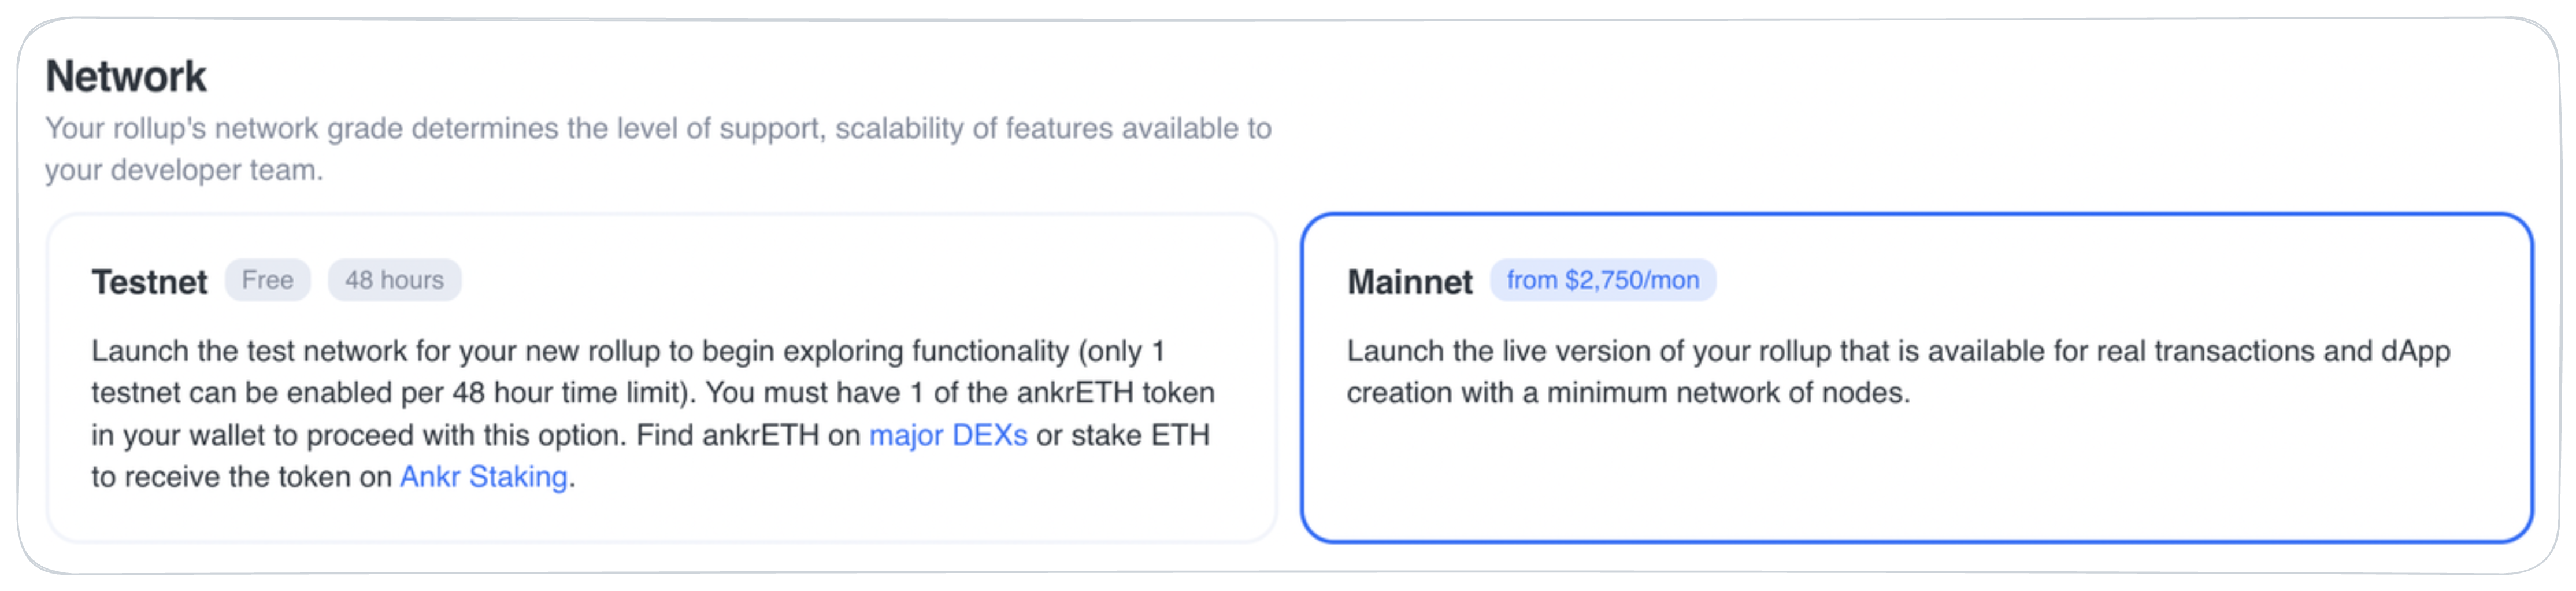
- Network: Select your Testnet option:
- Trial: Explore the rollup functionality for free (48 hours).
- Persistent: Use a permanent testing environment to experiment with your dapps before deploying them to Mainnet.
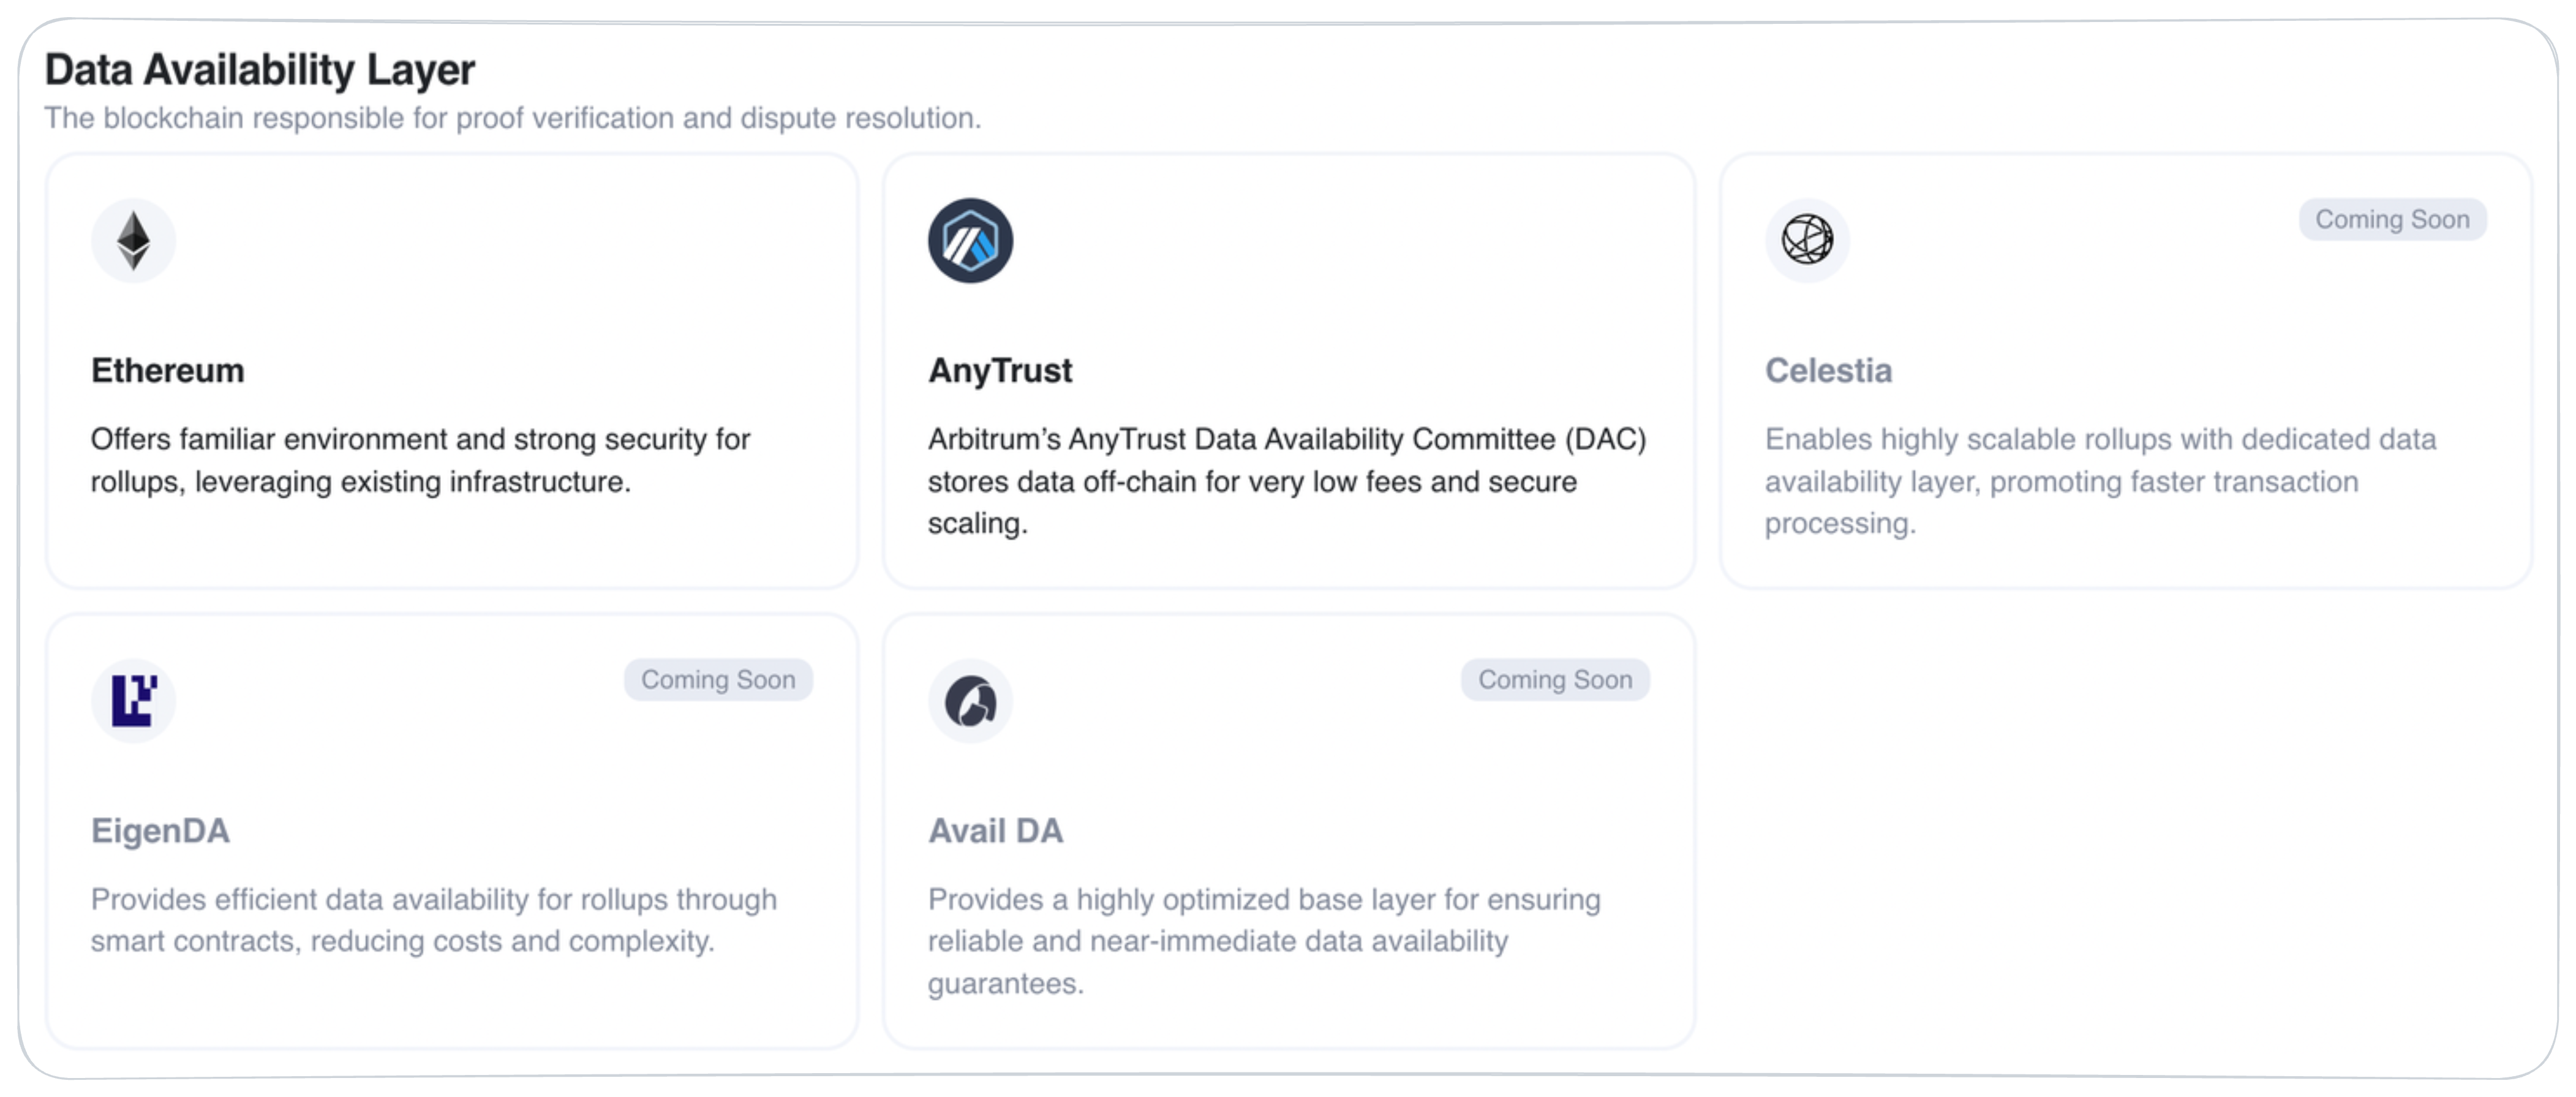
- Settlement Layer: Select a blockchain responsible for proof verification and dispute resolution:
- Sepolia: EVM-compatible testnet.
- Holesky: EVM-compatible testnet.
- Base Sepolia: a Testnet for Base.
- Kusama: a scalable, multichain network, serving as the experimental, community-focused canary network for Polkadot.
- Westend: a testnet for Polkadot, designed for testing features and deployments before moving to Kusama or Polkadot.
- Paseo: a testnet in the Polkadot ecosystem for validating new features in a safe environment before mainnet deployment.
- Parachain template (for the Polkadot stack only): Select an EVM or Generic template for you parachain.
- Coretime (for the Polkadot stack only): Select whether a Bulk, Interlacing, or No coretime required for your rollup.
- Data Availability Layer:
- Instant: Ethereum, Arbitrum AnyTrust — deploy instantly upon completing all the steps.
- Assisted (no label): Celestia, Eigen Layer, Avail DA, NEAR DA — provide your rollup requirements, and we will generate a Slack or Telegram group to finalize all the aspects of your deployment specification.
- Stack:
-
On the Configuration tab, specify the following parameters, and then click Next:
- Chain ID

- Rollup Name

- Gas Token:
- ETH: Use ETH to pay your network's gas fees.
- Custom Gas Token: For gas fees, use your custom ERC-20 token created and deployed on the network.
- USDC: Use USDC to pay your network's gas fees.
- ANKR: Use ANKR to pay your network's gas fees.
- KUS/WND/PAS: Use KUS/WND/PAS to pay for your network's gas fees.
- Create a Token: Get help setting up a custom gas token.
-
On the Infrastructure tab, check the components included in your package, and then click Confirm.

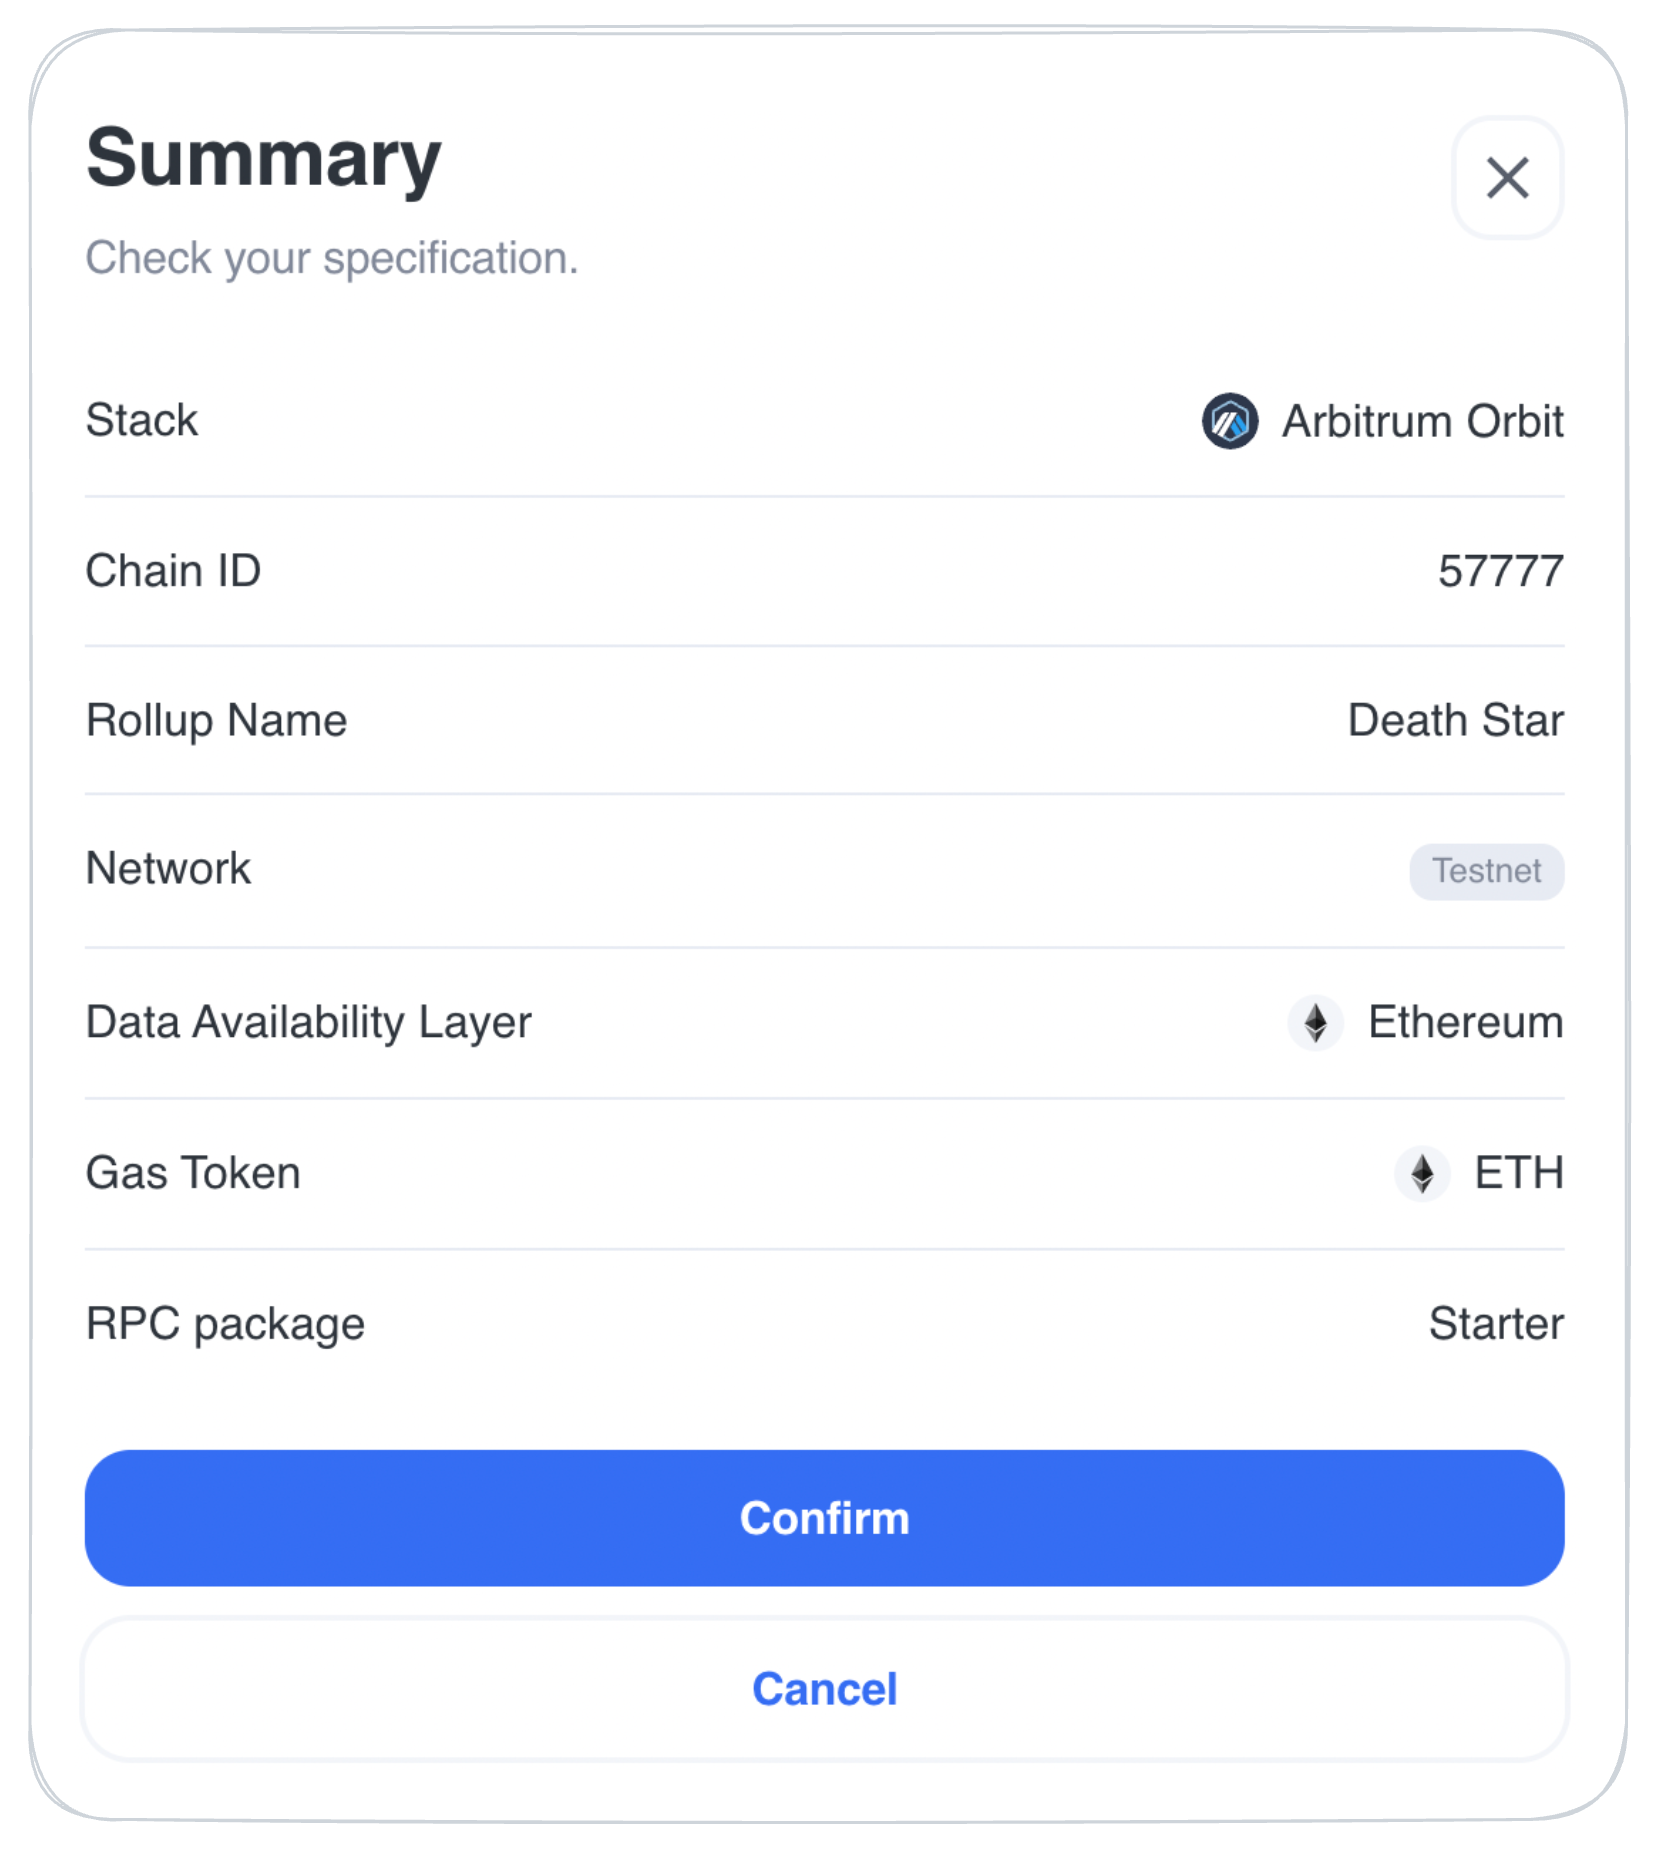
- In the Summary dialog, check your complete rollup specification, and then click Confirm.
-
As an anti-abuse measure, to deploy a rollup on a Testnet, you must have
1 ankrETHin your wallet.
In the Prove ankrETH dialog, perform the following actions to start your rollup deployment:- Click Connect MetaMask and prove address.
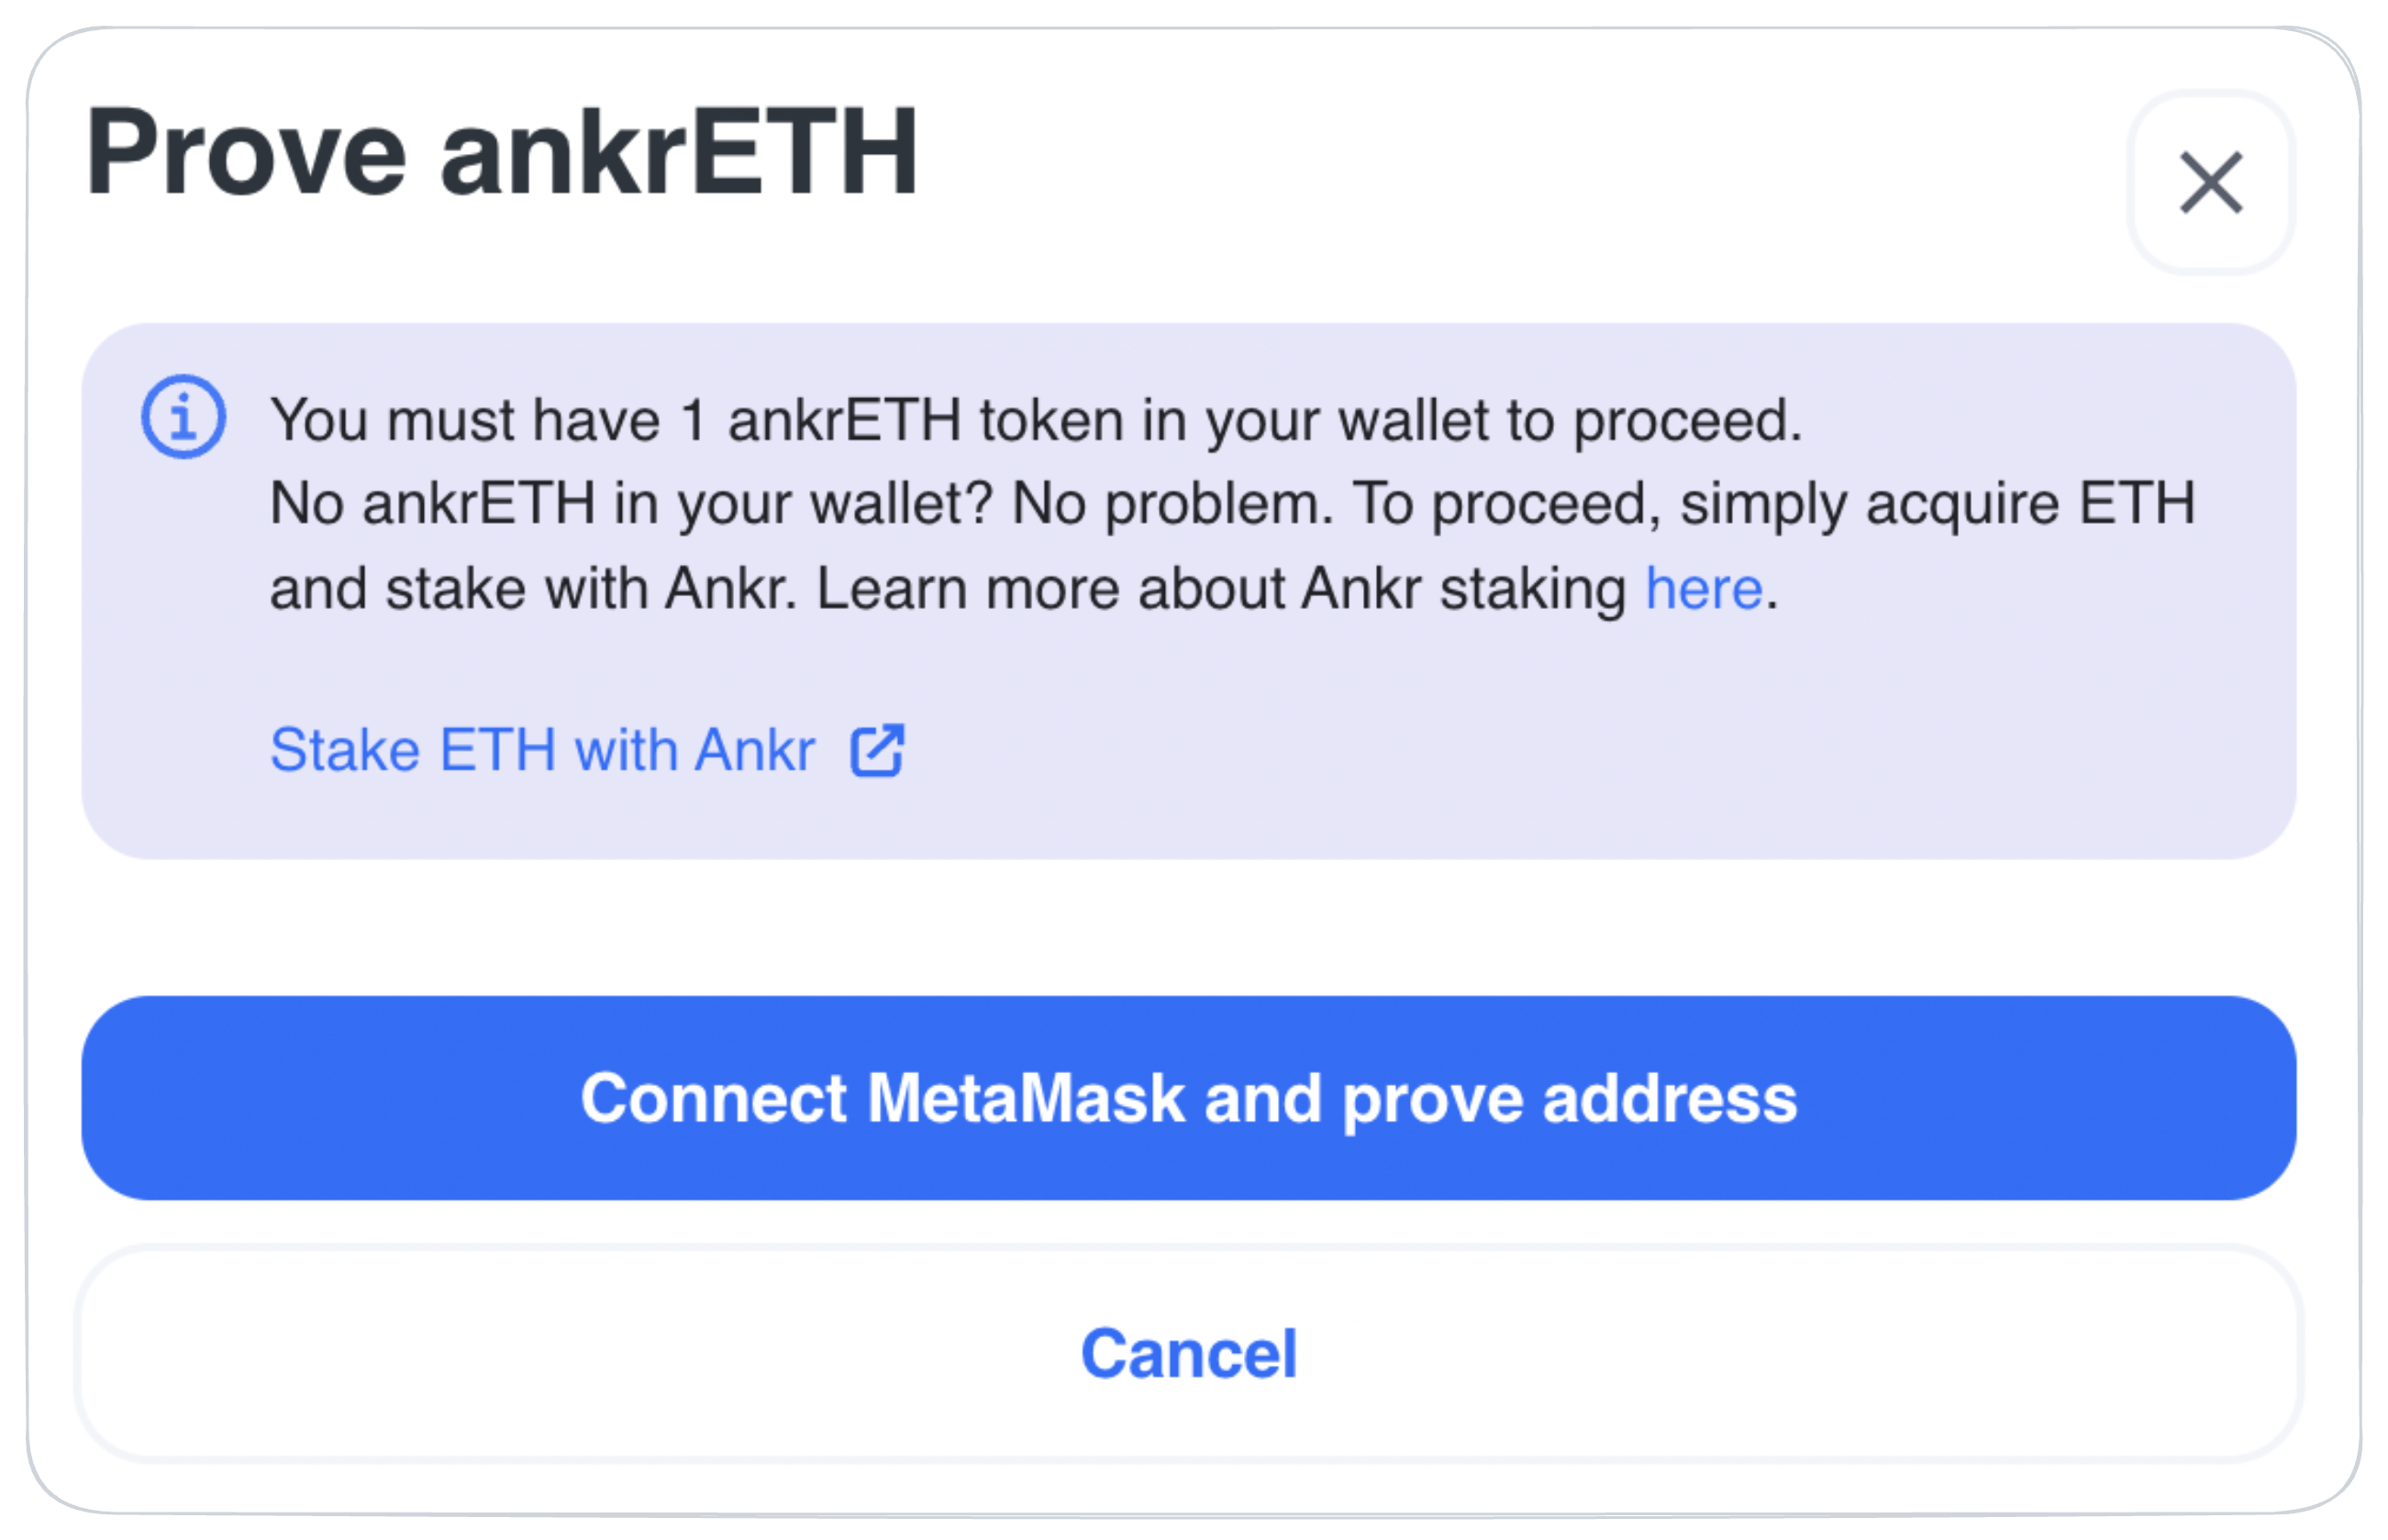
- In MetaMask, select the Ethereum address to associate with your account.
- Sign with MetaMask wallet.
Congrats — you've just configured and deployed your Testnet rollup!
Deploy Mainnet Rollup
To deploy a rollup using a Mainnet network, follow these steps:
-
Sign in on the Scaling Services (opens in a new tab) platform.
-
In Navigation, click Deploy Rollup to start a rollup configuration process.
-
On the Essentials tab, select the following rollup parameters, and then click Next:
- Stack:
- Instant: Arbitrum Orbit, OP Stack, Polkadot — deploy instantly upon completing all the steps.
- Assisted (no label): Base, Agglayer CDK, ZKsync's ZK Stack — provide your rollup requirements, and we will generate a Slack or Telegram group to finalize all the aspects of your deployment specification.
- Network: Select Mainnet — to deploy your rollup on a fully operational blockchain network.
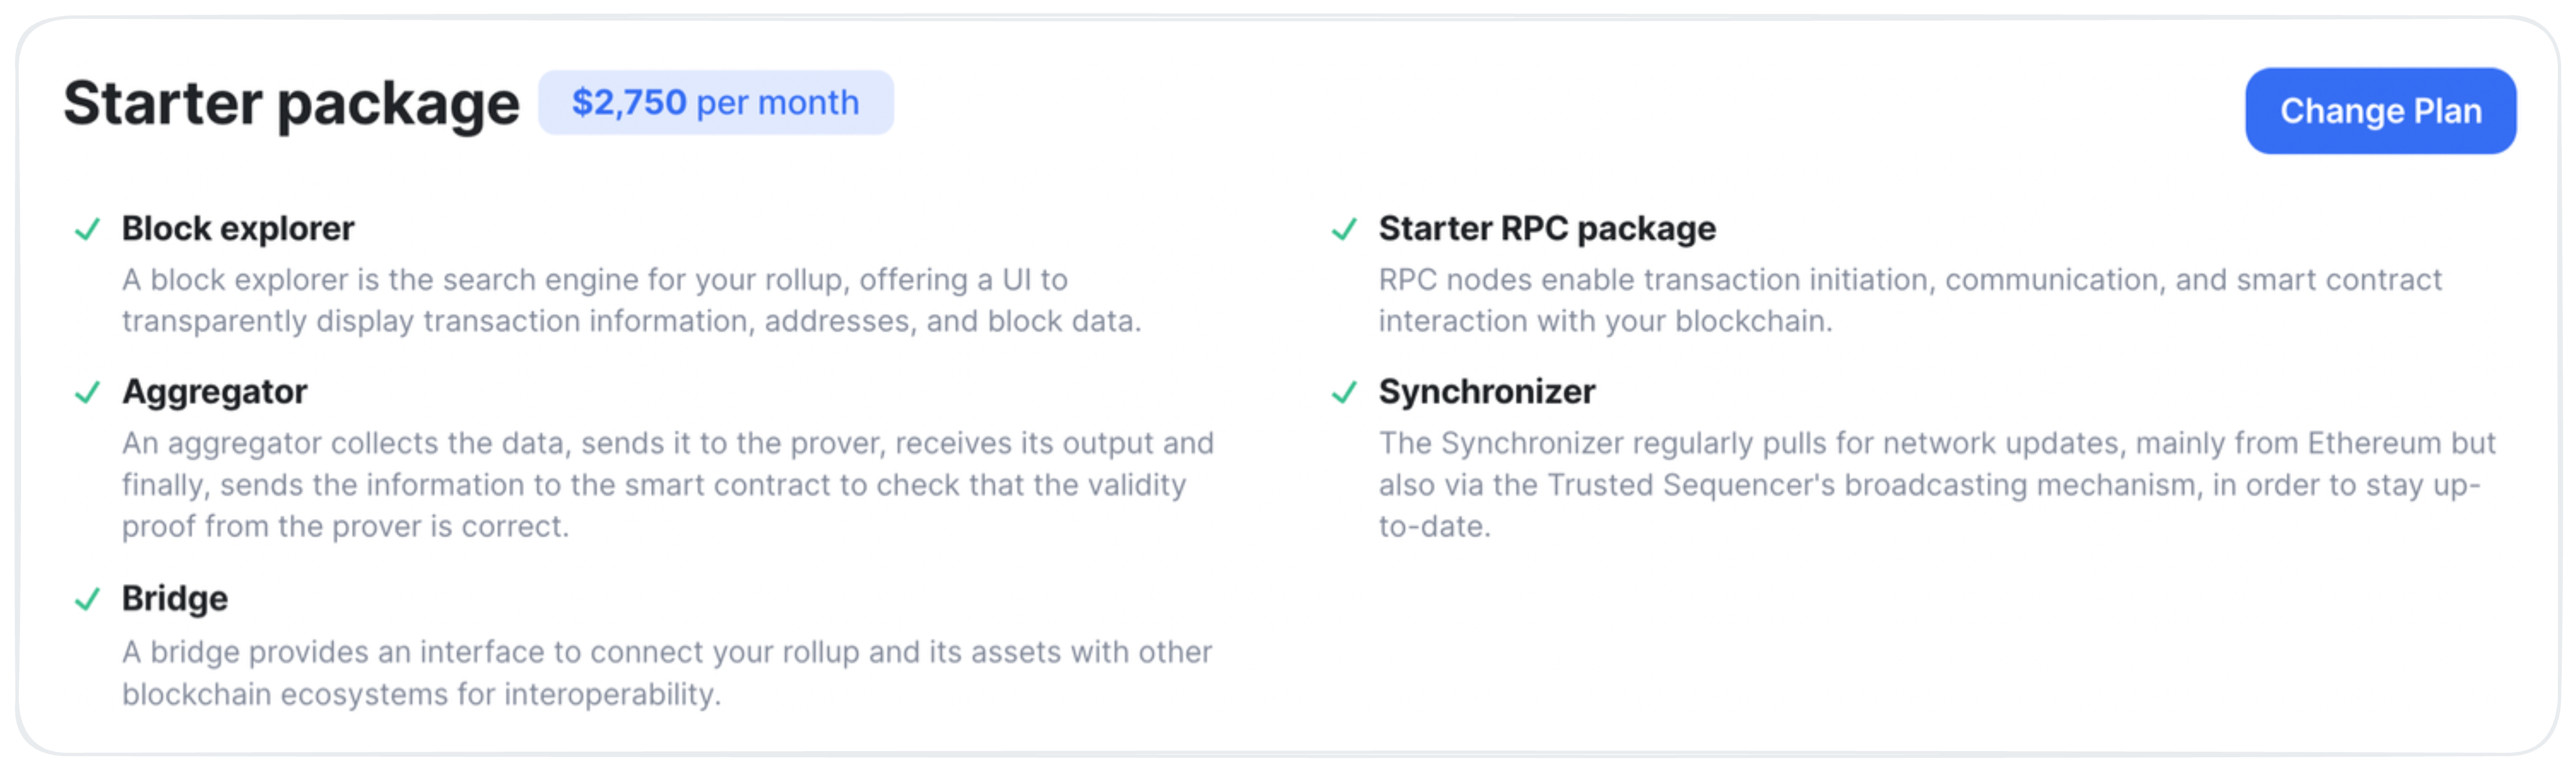
- Infrastructure Package: Upon selecting Mainnet, you have to select the Infrastructure to be used for your rollup solution:
- Starter Package: Block Explorer, Starter RPC Package, Aggregator, Synchronizer, Bridge.
- Advanced Package: Block Explorer, Pro RPC Package, Aggregator, Synchronizer, Bridge, Feature prioritization, Dedicated customer support, Advanced customization.
- Parachain template (for the Polkadot stack only): Select an EVM or Generic template for you parachain.
- Coretime (for the Polkadot stack only): Select whether a Bulk, Interlacing, or No coretime required for your rollup.
- Data Availability Layer:
- Instant: Ethereum, Arbitrum AnyTrust — deploy instantly upon completing all the steps.
- Assisted (no label): Celestia, Eigen Layer, Avail DA, NEAR DA — provide your rollup requirements, and we will generate a Slack or Telegram group to finalize all the aspects of your deployment specification.
- Stack:
-
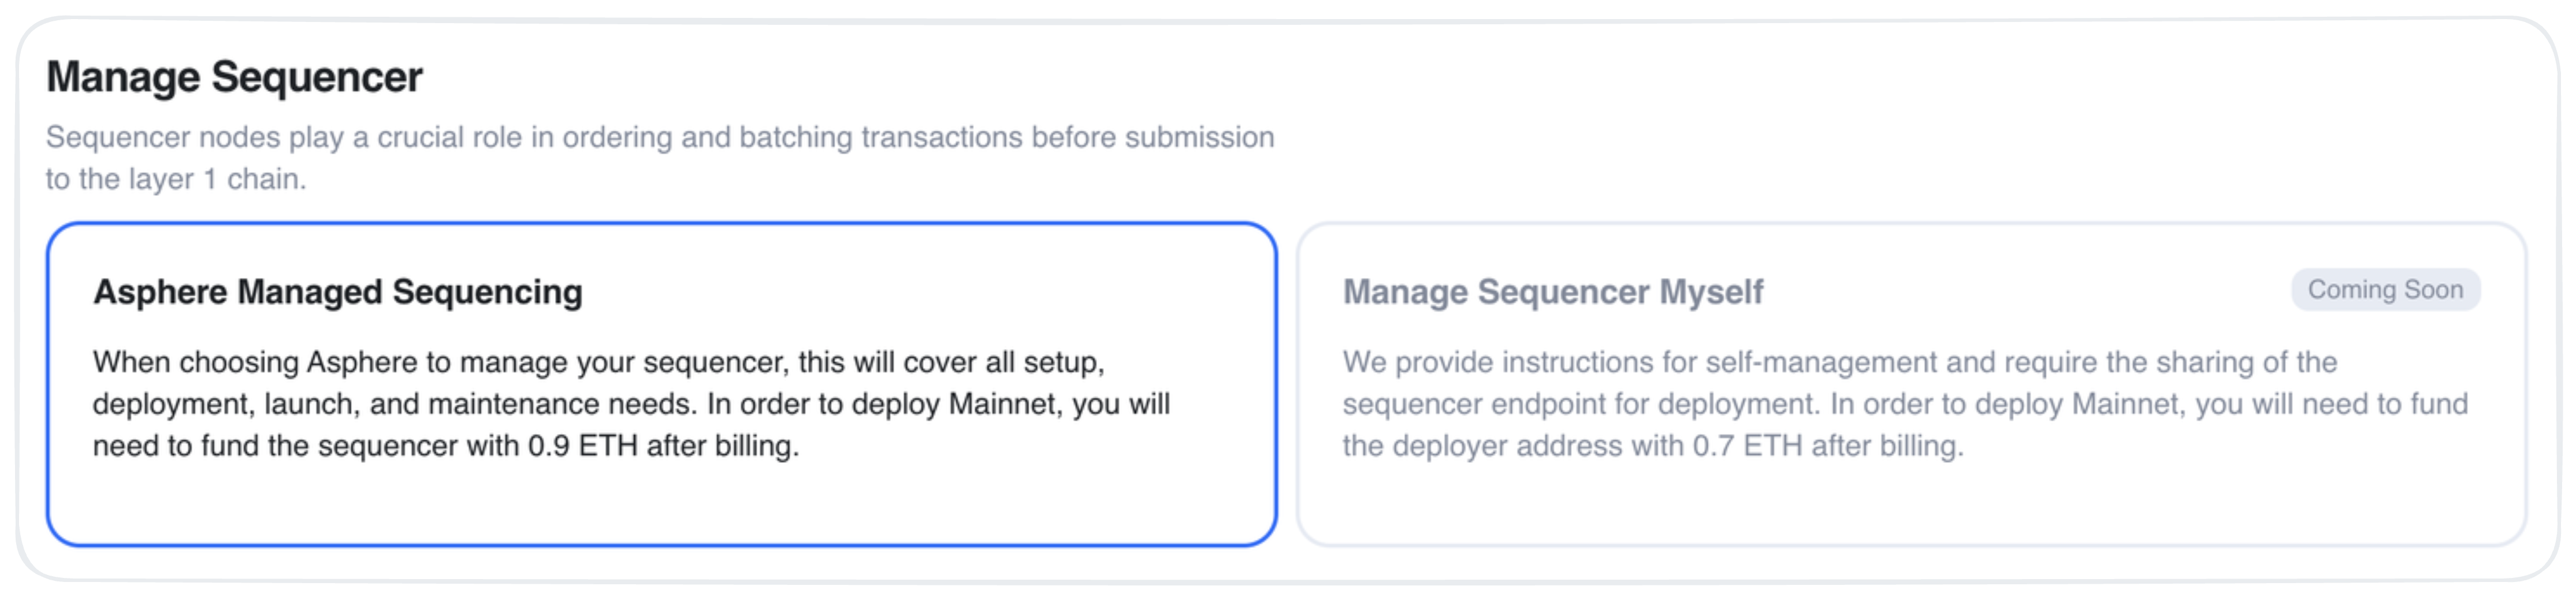
On the Sequencer tab, select whether you'd like to have an Asphere-managed sequencer or a self-managed sequencer.
- On the Configuration tab, specify the following parameters, and then click Next:
- Chain ID
- Rollup Name
- Gas Token:
- ETH: Use ETH to pay your network's gas fees.
- Custom Gas Token: For gas fees, use your custom ERC-20 token created and deployed on the network.
- USDC: Use USDC to pay your network's gas fees.
- ANKR: Use ANKR to pay your network's gas fees.
- DOT: Use DOT to pay your network's gas fees.
- Create a Token: Get help setting up a custom gas token.
- On the Infrastructure tab, check the components included in your package, and then click Confirm.
- In the Summary dialog, check your complete rollup specification, and then click Confirm and Pay. Make sure you have
0.9 ETHand0.2 Custom Gas Token(if using such an option) in your wallet to deploy your rollup on a Mainnet.
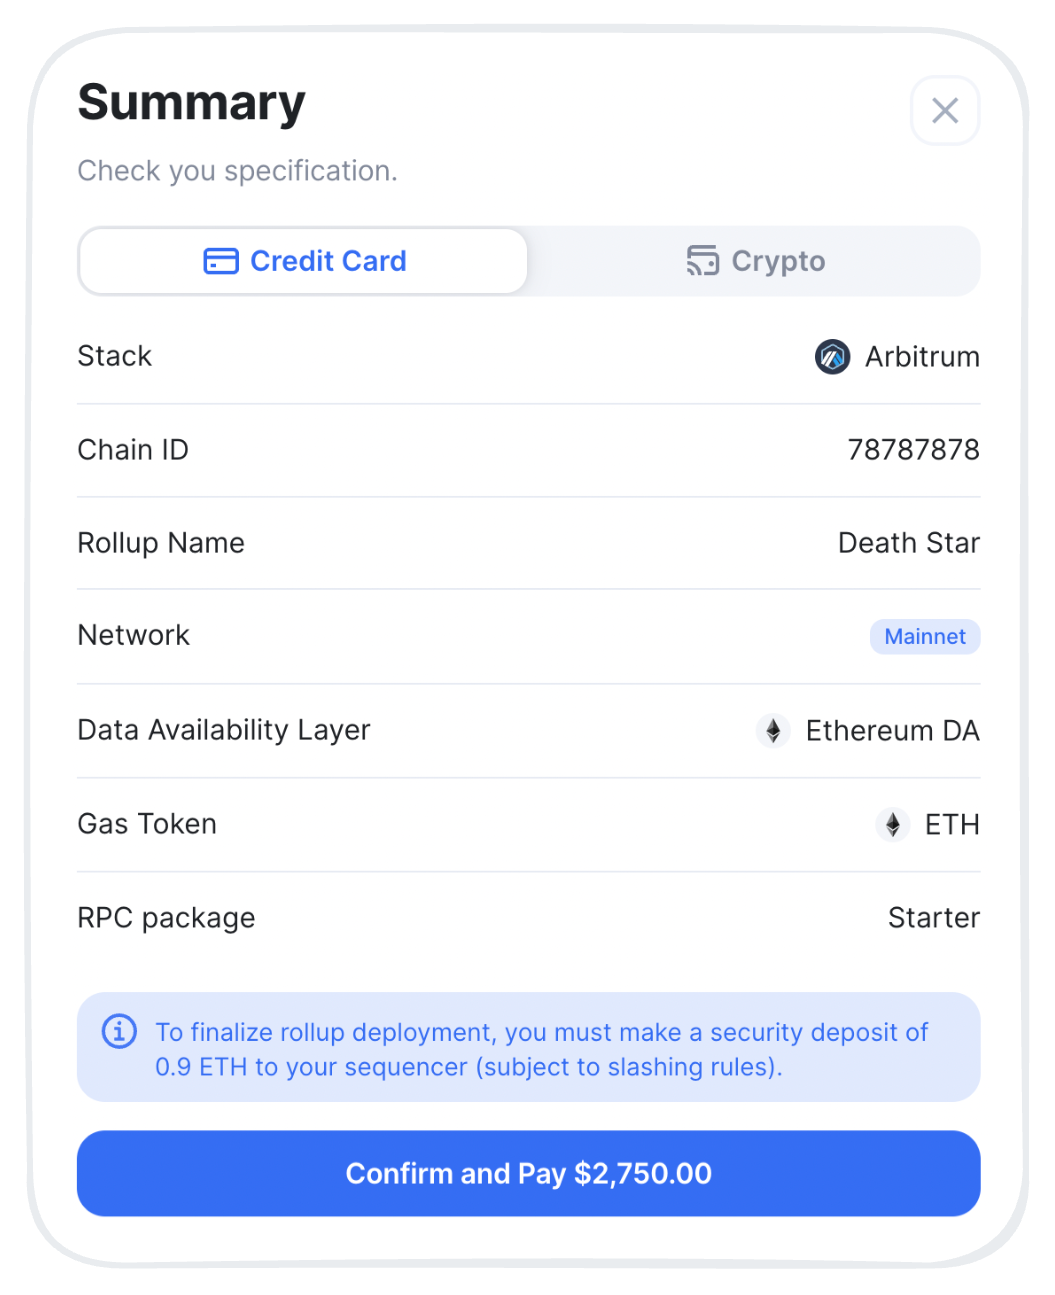
- On the Stripe / Loop Crypto checkout page, follow the instructions to pay for and deploy the configured rollup.
Congrats — you've just configured and deployed your Mainnet rollup!
Solana SPE Deployment
An SPE (opens in a new tab) deployment process consists of the following parts:
- Sign in: Authenticate on the platform to start using its functionality.
- Deploy Rollup: Define your SPE settings, and we will generate a Slack/Telegram group to finalize all the aspects of your deployment specification.
Sign in
First things first, sign in to use the platform's functionality:
- Go to the Solana No-code Deployer (opens in a new tab) platform.
- Click Sign in > Continue with Google, and then select an account you'd like to use.
Congrats — you've just signed in to the Solana SPE deployment platform!
For those signing in for the first time, please enter your basic company information so that we know our customers.
Deploy SPE
To define an SPE deployment configuration, follow these steps:
-
Sign in on the Solana No-code Deployer (opens in a new tab) platform.
-
In Navigation, click Deploy Chain to start an SPE configuration process.
-
On the Essentials tab, select the following SPE parameters, and then click Next:
- Stack: SVM.

- Network: Select either a Testnet or production-ready Mainnet option for your SPE:

- Infrastructure Package:
- For Testnet:
- Trial: Explore the SPE functionality for free (48 hours).
- Persistent: Use a permanent testing environment to experiment with your dapps before deploying them to Mainnet.
- For Mainnet:
- Starter package: Block Explorer, Starter RPC Package.
- Advanced package: Block Explorer, Pro RPC Package.
- For Testnet:
- Network access type:
- Private: a restricted network — access, validation, and governance limited to approved participants.
- Public: an open network — access, validation, and governance available to all participants.

-
On the Configuration tab, specify the following parameters, and then click Next:
- Chain Name

- Gas Token:
- SOL: Use SOL (opens in a new tab) to pay your network's transaction fees.
- Gasless: Transactions require no SOL from the sender.
-
On the Infrastructure tab, check the components included in your package, and then click Confirm.

- In the Summary dialog, check your complete SPE specification, click Confirm via Telegram/Slack, and then enter your Telagram Username / Slack Email so that we can generate a Slack/Telegram group to finalize all the aspects of your deployment specification.
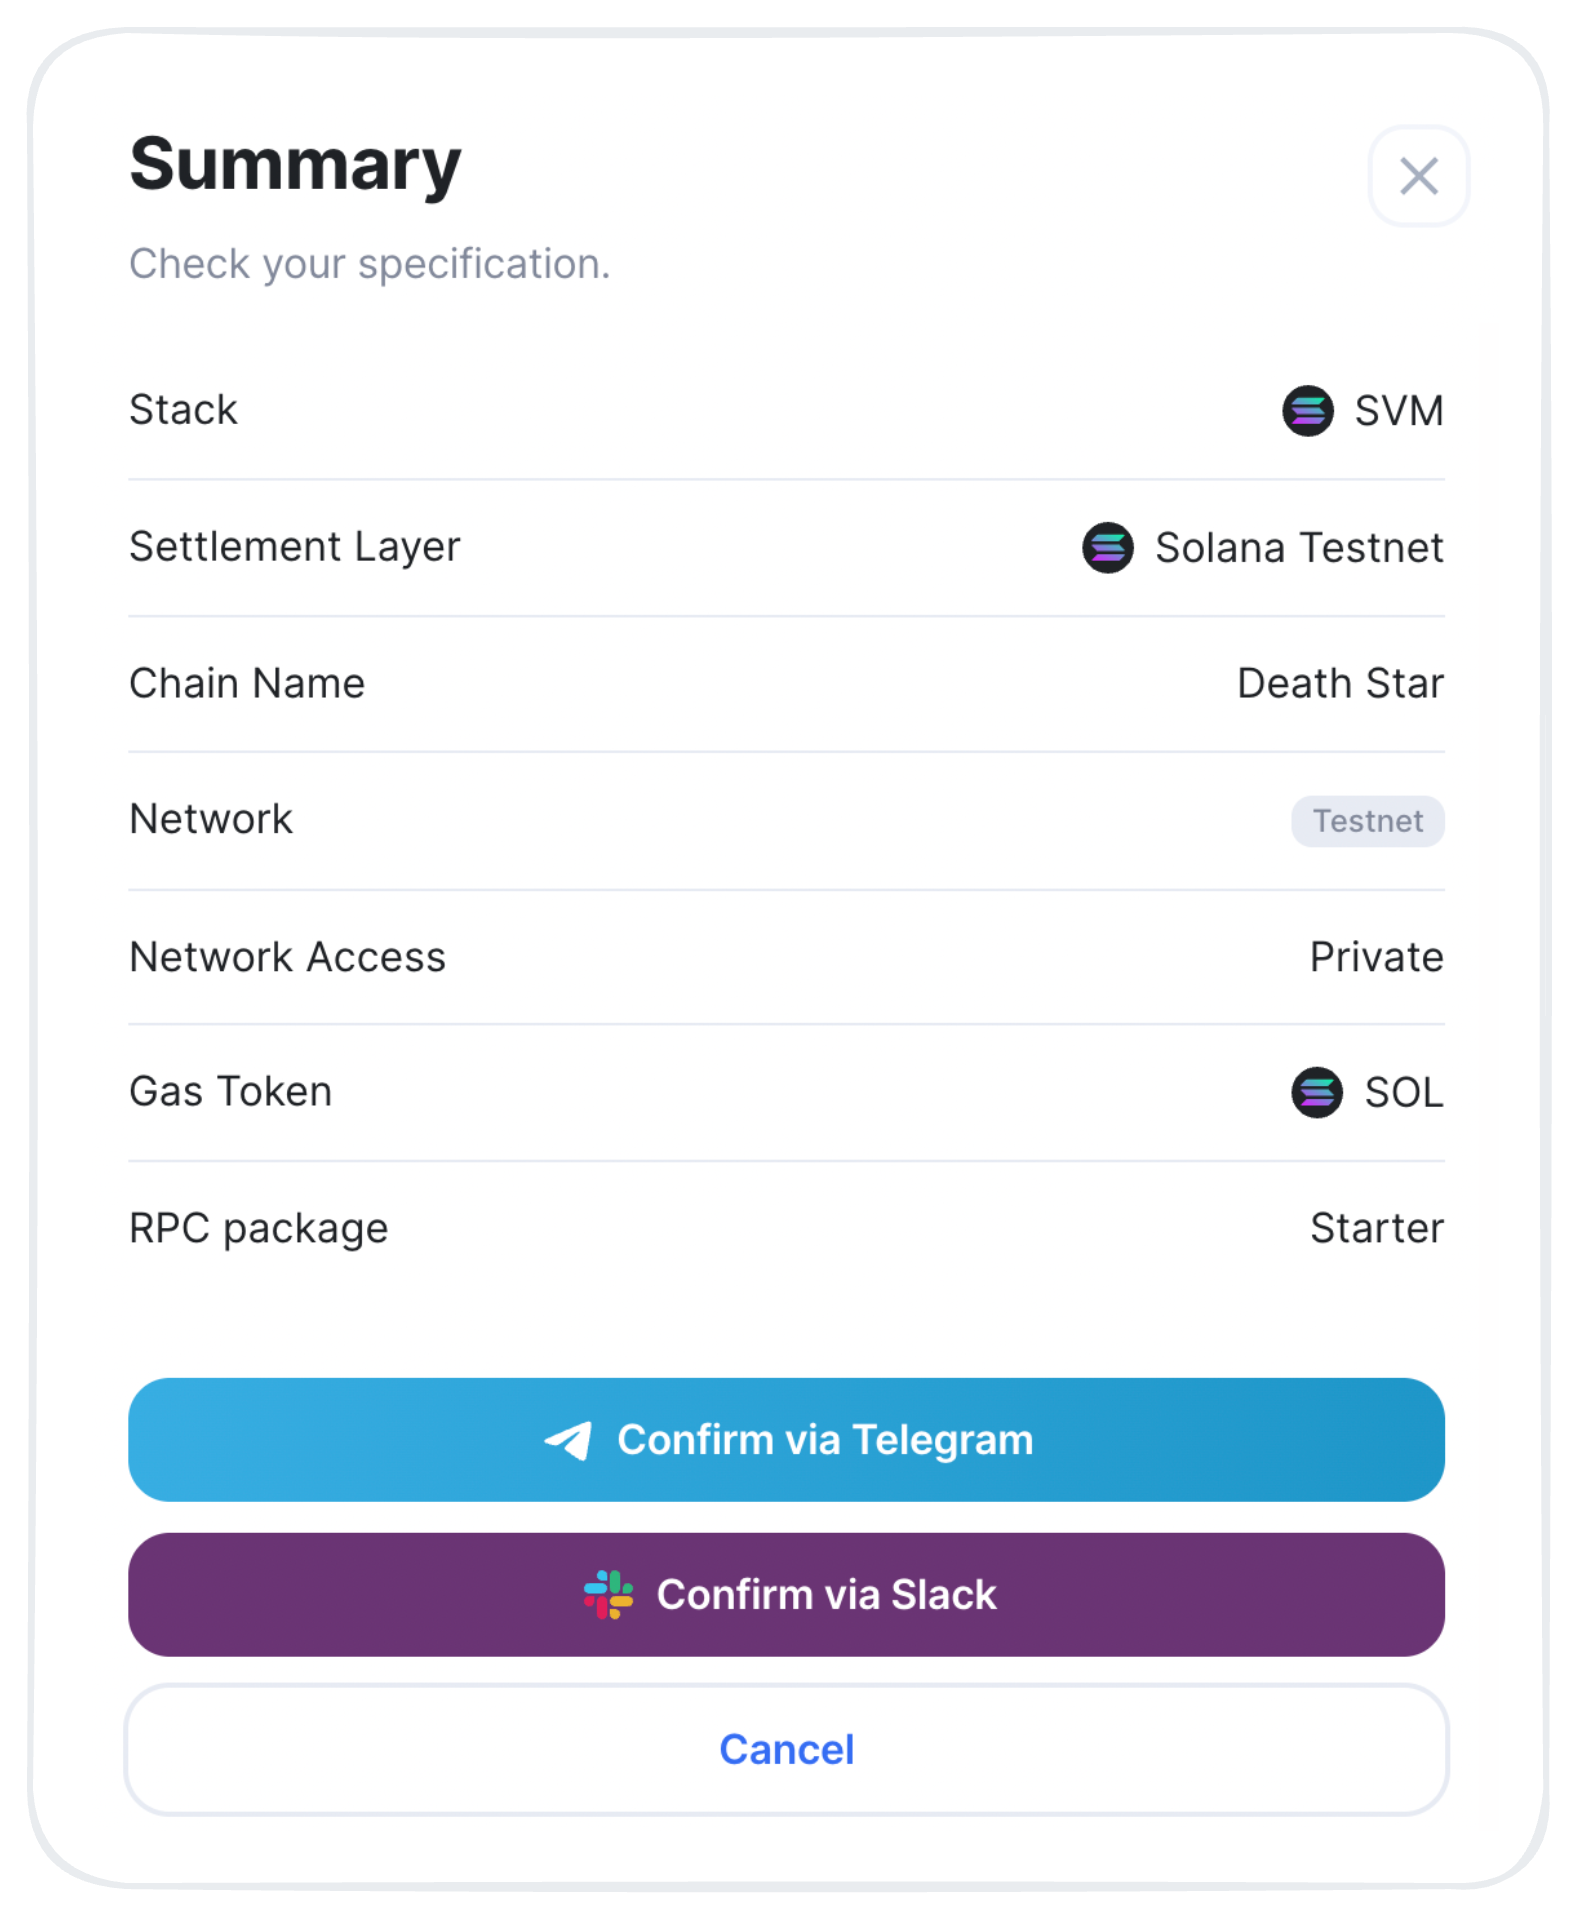
Congrats — you've just defined your SPE configuration and our specialist will reach out to you shortly via the preferred communication channel to finalize all the aspects of your deployment specification!
Custom Gas Token
Deploying your AnyTrust Orbit chain or OP Stack chain, you have the option of using a custom gas token, other than ETH, for gas payments on the network. When choosing this option, there are certain requirements that the token needs to comply with.
AnyTrust Orbit chain
Requirements
A custom gas token must meet the following requirements:
- ERC-20 Compliance: The token must conform to the ERC-20 standard.
- Native Deployment: The token must be natively deployed on the parent chain.
- Native Bridging and Proper Configuration: During chain deployment, the gas token must be "natively bridged" and configured as the native gas token on the Orbit chain.
Custom gas token restrictions for ERC-20:
- The token must be configured with 18 decimals.
- The token can't be rebasing or have a transfer fee.
- The token must only be transferable via direct calls to the token address.
- The token must only be able to set allowances via direct calls to the token address.
- The token must not have a callback on transfer.
- Users must not be able to make a transfer to themselves that results in a revert.
OP Stack chain
Requirements
The custom gas token must adhere to the following constraints:
- Must be a valid ERC-20 token.
- The number of decimals on the token MUST be exactly 18.
- The name of the token MUST be less than or equal to 32 bytes.
- Symbol MUST be less than or equal to 32 bytes.
- Must not be yield-bearing.
- Cannot be rebasing or have a transfer fee.
- Must be transferrable only via a call to the token address itself.
- Must only be able to set allowance via a call to the token address itself.
- Must not have a callback on transfer, and more generally a user must not be able to make a transfer to themselves revert.
- A user must not be able to make a transfer have unexpected side effects.
Arbitrum Bridge Setup
You might be interested in how-tos for the following scenarios:
Add Testnet to Arbitrum Bridge
Currently, adding a Testnet Orbit chain to the Arbitrum bridge must be done locally. This means that you will configure the bridge UI to display the desired chain, but this change will only apply to you and be accessible from localhost.
To add a Testnet chain to Arbitrum bridge, follow these steps:
- Navigate to https://bridge.arbitrum.io/ (opens in a new tab).
- Connect to the bridge UI using your Ethereum wallet.
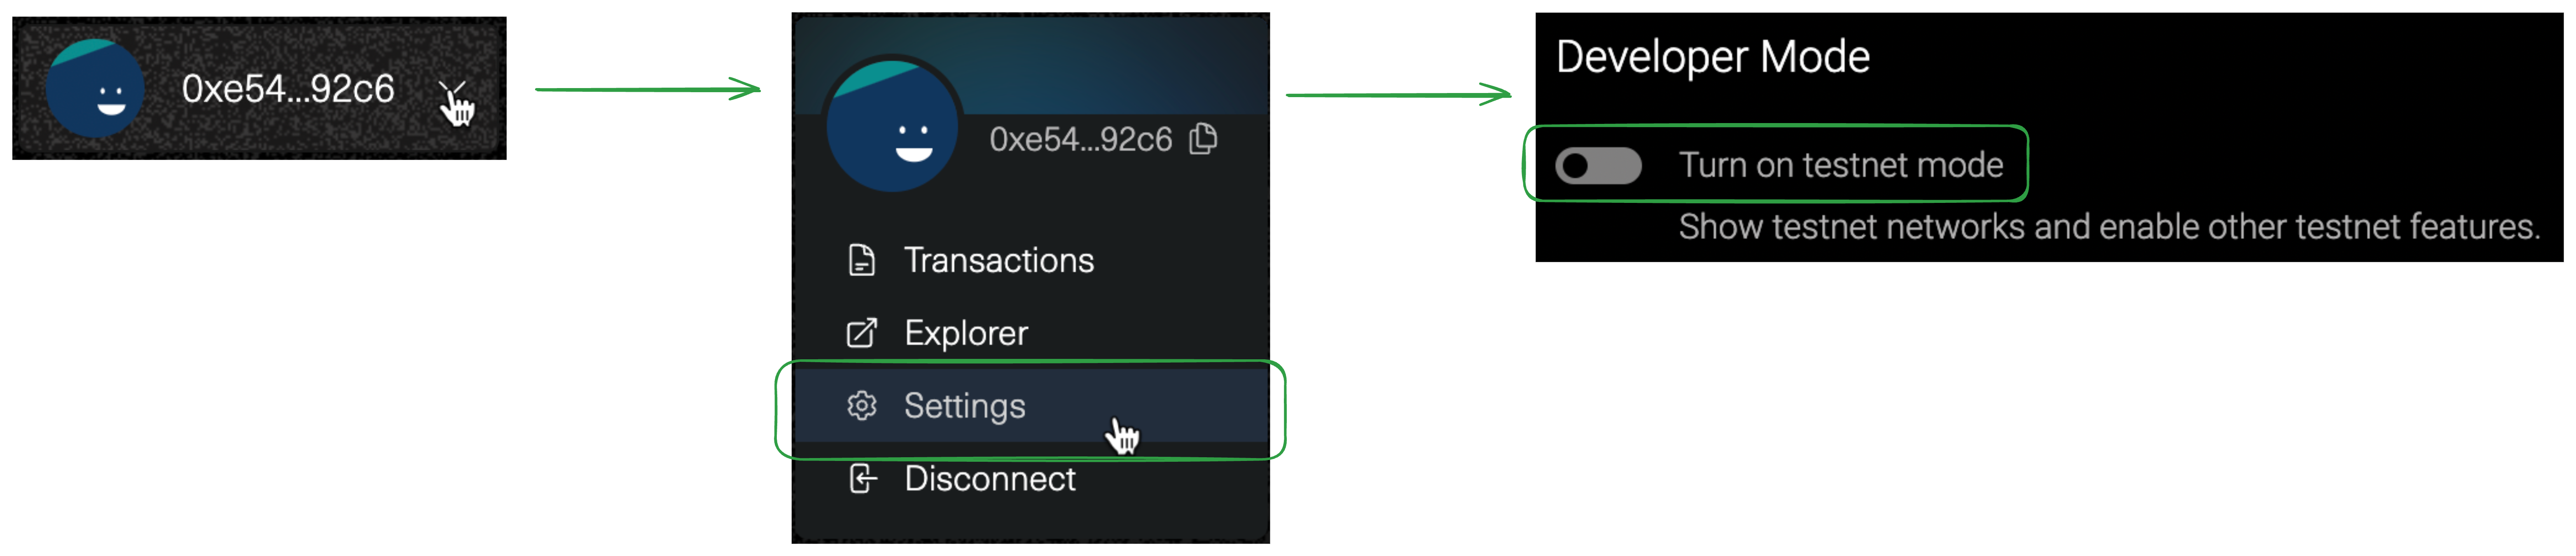
- In the bridge UI, click your Wallet address > Settings > Turn on testnet mode to activate a Testnet mode.
- In Settings > Add Testnet Orbit Chain, add a JSON configuration, and then click Add Chain. The JSON configuration must contain the following data:
- A transaction output from bridge deployment
- Bridge setup data from
OrbitSetupScript.json
{
  "chainInfo": {
    "minL2BaseFee": 100000000,
    "networkFeeReceiver": "0x72efD0dA4E05E1db05eB4Cd34e736Ee892437065",
    "infrastructureFeeCollector": "0x72efD0dA4E05E1db05eB4Cd34e736Ee892437065",
    "batchPoster": "0x11CF25037F5E7e789D4cF3D0AEF22bE84220BF68",
    "staker": "0xB9a52331D21c0b4F26b48c57A4d56C7725bCBa29",
    "chainOwner": "0x72efD0dA4E05E1db05eB4Cd34e736Ee892437065",
    "chainName": "REGEN",
    "chainId": 749,
    "parentChainId": 17000,
    "rpcUrl": "https://rpc-nitro.testnet-social-network.raas.ankr.com",
    "explorerUrl": "http://localhost",
    "nativeToken": "0x4c007cDcC5355f53cfD61B29cEa68174170745F8"
  },
  "coreContracts": {
    "rollup": "0x27F339cfe4e43DF353370fcA6Bbd0cF2DF0F74d5",
    "inbox": "0x9C71868E01A91298aD3DbF9EF64C932aeC08aEb4",
    "outbox": "0x865A8Ab91FA987B3D5A4ED5d74932Bf1b24e75F7",
    "adminProxy": "0x114439795524e011944a0E69F087a497cE681e41",
    "sequencerInbox": "0x39eDedfaaC0EF97ffE8FD189fA18E7D8Bf2B24b7",
    "bridge": "0x7caDa6Efc126d59afCAeEd763E51c8A15d57269B",
    "utils": "0x0D5CbCc8D2c97F1dEB94f6f4dd3a36A7C01c01EE",
    "validatorWalletCreator": "0x653A6F645b680bF0E3c57d1eE0c0fcD1e01470F3"
  },
  "tokenBridgeContracts": {
    "l2Contracts": {
      "customGateway": "0xA004f196Aa2c00a6743ca6850862fDAAc20FAA54",
      "multicall": "0xF3cA368BeF5252476E84de2A835167c90262D3C1",
      "proxyAdmin": "0x114439795524e011944a0E69F087a497cE681e41",
      "router": "0xfFbFdAd733822485b88bA1AfDB42dF76f07F802a",
      "standardGateway": "0xe762bED1C0fA4F49bac04580D42E2D3570E9357c",
      "weth": "0x0000000000000000000000000000000000000000",
      "wethGateway": "0x0000000000000000000000000000000000000000"
    },
    "l3Contracts": {
      "customGateway": "0x850d2501E6Da6B105aFb689529497B7024776E78",
      "multicall": "0xc5DD7Dab959Eb221911a58dC469d769270C2De2F",
      "proxyAdmin": "0xe762728C1022dAe5D2d0f4a0317944B9d70B309C",
      "router": "0x9A2e67eE268cE392A2D91D8fF87bac1D45980B98",
      "standardGateway": "0xe17851222aba0821EAfc4F0AE8fDf4d8827124fa",
      "weth": "0x0000000000000000000000000000000000000000",
      "wethGateway": "0x0000000000000000000000000000000000000000"
    }
  }
}
Congrats — you've just added a Testnet chain to the bridge UI for local use!
Add Mainnet to Arbitrum Bridge
To have a Mainnet chain added to the Arbitrum bridge, there are two options available:
- Request adding a Mainnet chain by filling out the form (opens in a new tab).
- Fork and host the bridge UI, modifying it to add mainnet chains. The bridge UI can be found on OffchainLabs' GitHib (opens in a new tab).
OP Stack: Bridging
The OP Stack is designed to build Layer 2 systems that are deeply integrated with Ethereum. While OP Mainnet handles transaction execution off-chain, developers need the ability to transfer data and tokens between OP Mainnet and Ethereum. This process is known as bridging.
For more information, refer to the Bridging Basics (opens in a new tab) section in the official Optimism documentation.